
We needed a new company brochure, with neither the schedule nor the budget to hand it to a designer. Normally that means opening Illustrator. This time we tried something else: write it in HTML and CSS, export the PDF from Chrome, and send that to the print shop. The result was a PDF that met every requirement the printer had — A4 tri-fold, bleed, outlined fonts — and the whole thing was refined one line at a time in chat with AI (Claude Code).
This post is a record of that iteration. It is less about code and more about the rhythm of “spot a problem → give a one-line instruction → check the result → find the next problem”.
The result — an A4 tri-fold brochure
The A4 tri-fold brochure is shown here as its two finished pages first, outside and inside.
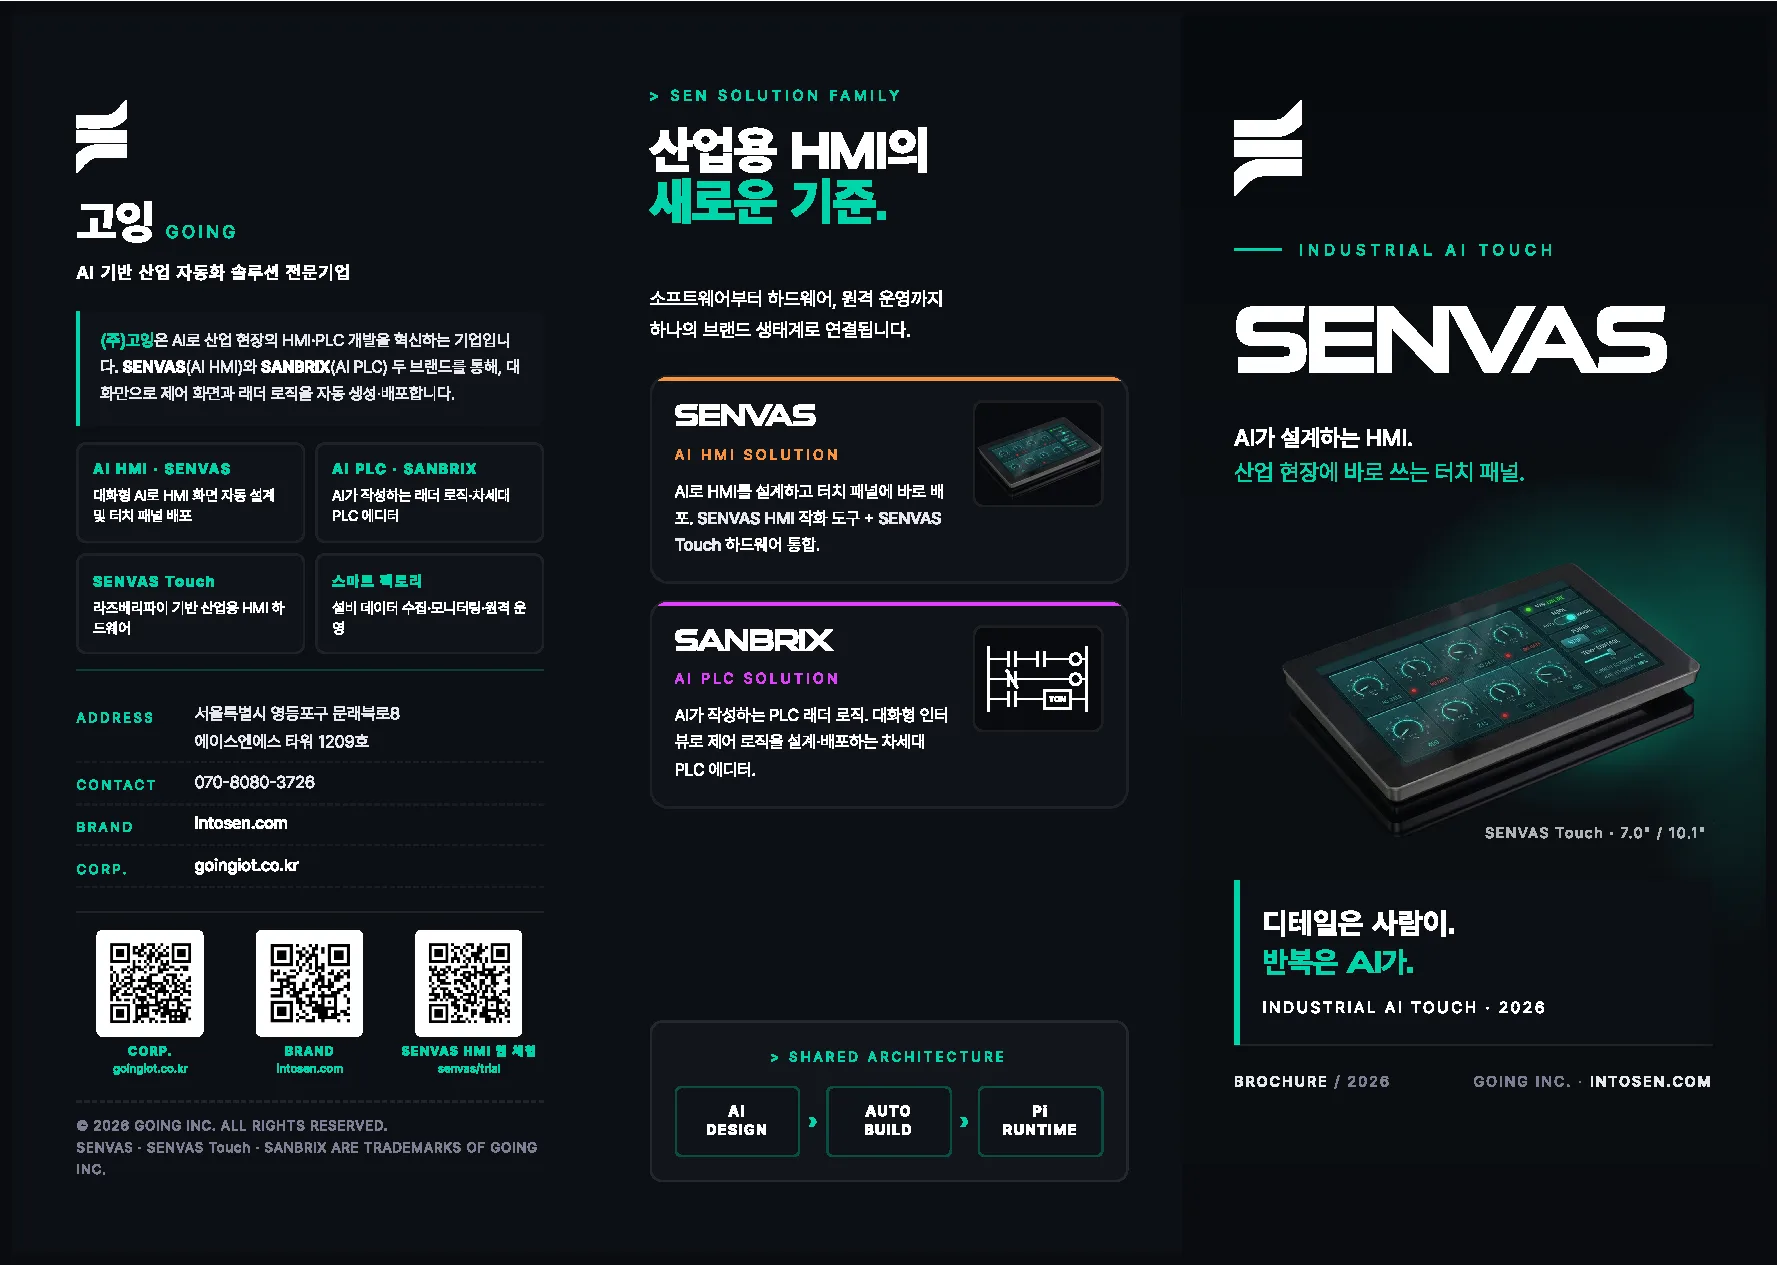
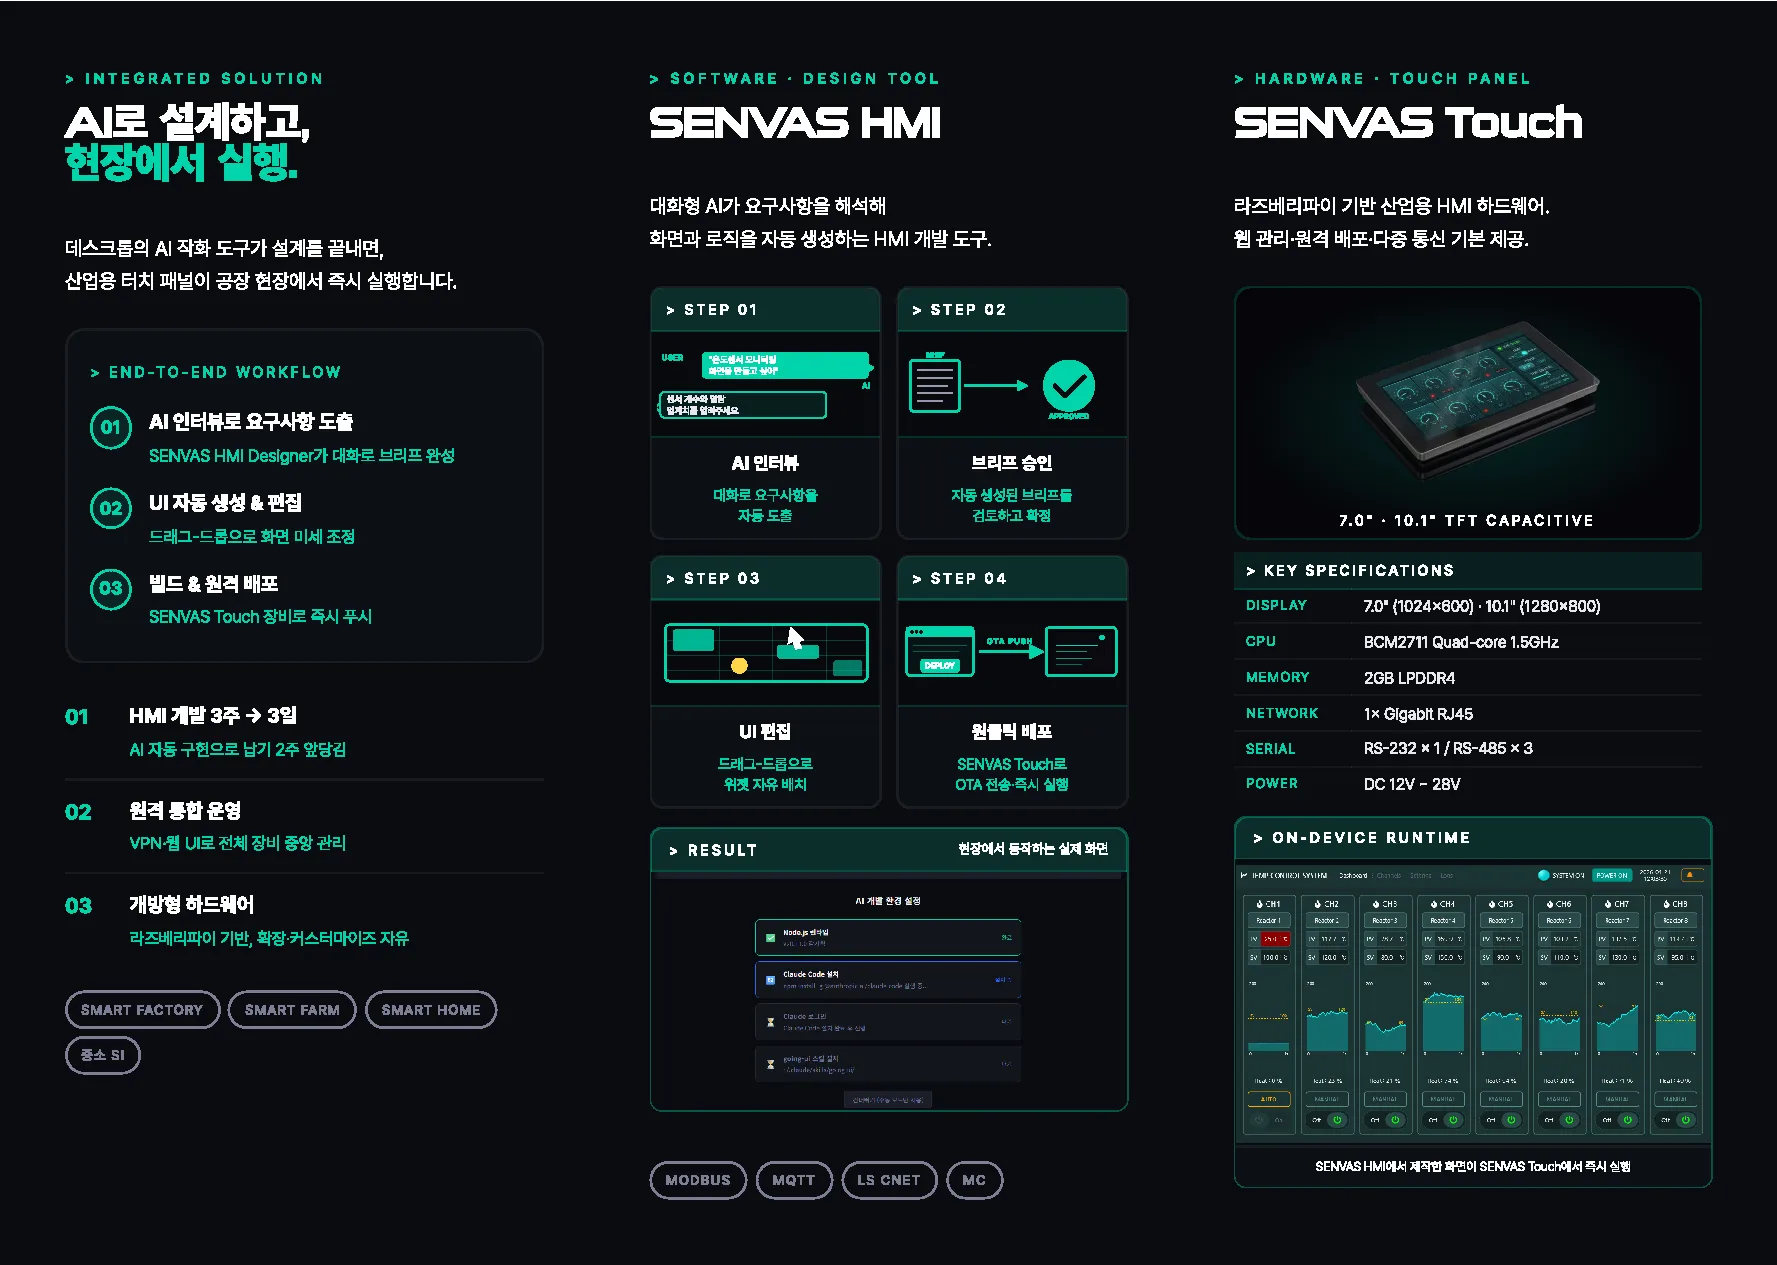
- Unfolded size: A4 landscape, 297 × 210mm, tri-fold with 99mm panels
- Print working size: 301 × 214mm (including 2mm bleed)
- All fonts outlined; Pretendard and SuiGeneris embedded, then converted to vector paths
The stack — HTML/CSS and Chrome headless
| Step | Tool | Role |
|---|---|---|
| Design | HTML + CSS (@page, position: absolute) | Precise placement of the three panels |
| PDF export | Chrome Headless (--print-to-pdf) | HTML to PDF |
| Outlining | Ghostscript 10.03.1 (-dNoOutputFonts) | Fonts to vector paths |
| Preview | Ghostscript (png16m) | PNG render per page |
| Conversation | Claude Code (Anthropic) | Korean requirements into code patches |
A single @page { size: 297mm 210mm; margin: 0 } decides the print size, and inside it position: absolute
places the three panels at left (0mm), center (99mm) and right (198mm) with knife precision. Millimeter-level
layout without a design tool.
Iteration 1 — object-fit cropped the runtime image inside its caption box
The > ON-DEVICE RUNTIME box sits in the SENVAS Touch section of the brochure, and the screenshot inside it
was being clipped slightly at the top and bottom.
The cause was simple:
- Image ratio: 1024 × 614 ≈ 1.67
- Screen area of the box: 81mm × 36mm ≈ 2.25
- With
object-fit: cover, filling the width cut off the top and bottom
The fix:
- Increase the box height from
48mmto62mm - Change
object-fit: covertoobject-fit: contain - The caption then wrapped onto two lines, which left gaps on either side →
force it onto one line with
font-size: 6ptandwhite-space: nowrap, freeing up more screen area
“Do not crop the image” and “do not leave gaps at the sides” had to be satisfied together, which meant adjusting the caption and the box dimensions in tandem. We threw one line at a time at the AI (“it is overlapping the text above”, “fill in the gap at the side”) and checked the result, about five rounds of it.
Iteration 2 — A/B testing a different runtime image
The runtime screen A/B comparison happened because we were not sure which screen belonged in the ON-DEVICE RUNTIME slot: a temperature monitoring screen full of gauges, or the tidier TEMP CONTROL SYSTEM screen with a line chart and controls.
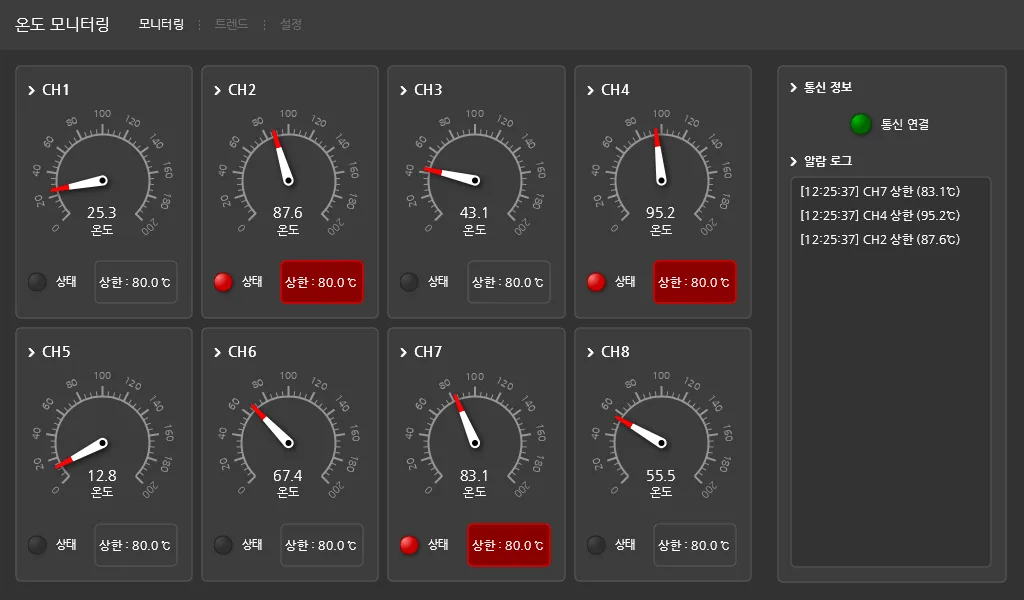
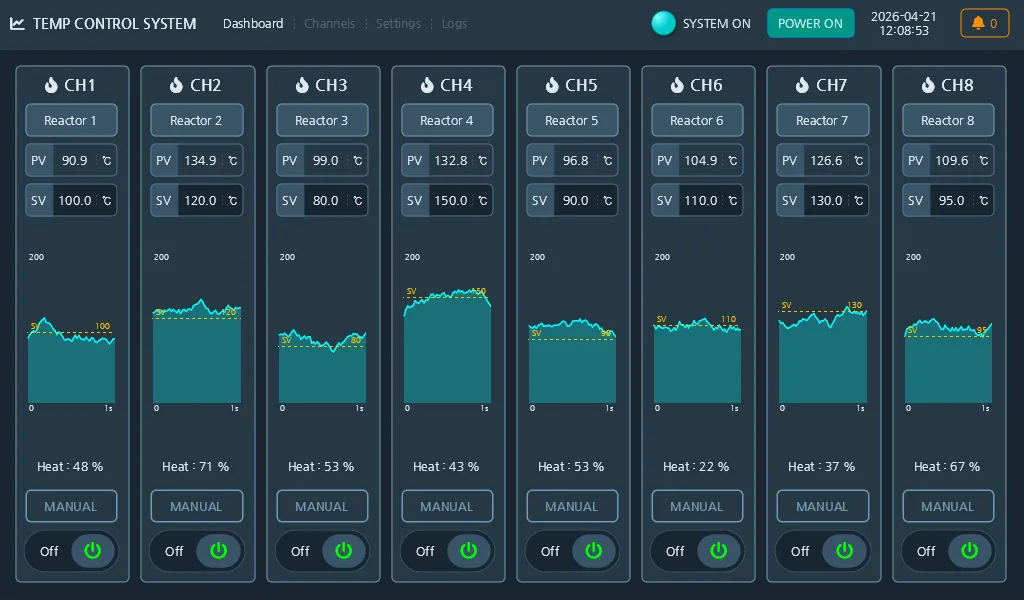
Rather than editing tone_c.html in place, we made a variant and opened both PDFs side by side. One line to the
AI — “make a separate copy with just the image swapped” — was all it took.
Because the base is HTML, “swap the image src and re-export the PDF” is nearly free. In Illustrator this would have meant carrying two files around and exporting twice each time.
Iteration 3 — meeting the print shop’s 2 mm bleed and fold rules
The print shop’s guidelines turned out to be demanding once the A/B comparison was done and we went to hand the file over.
- Trim size 210 × 297mm, working size 214 × 301mm → add 2mm of bleed
- On a tri-fold, the folded-in panel must be 2mm shorter than the cover (otherwise the inner fold gets pinched by the outer one)
- Fonts must be converted to outlines before saving the PDF (a PDF without that is not grounds for a complaint)
- No special characters in the filename; note it in the comments if the work was not done in Adobe
Applying 2mm of bleed
@page {
  size: 301mm 214mm;  /* 297×210 + 2mm bleed */
  margin: 0;
}
.sheet {
  width: 297mm; height: 210mm;
  margin: 2mm;        /* the outer 2mm is filled by the #0a0c0f background */
  background: #0a0c0f;
}
The 2mm tri-fold rule
Given the C-fold (letter fold) structure:
- The left panel of the outside (Sheet 1) is the folded-in panel
- The right panel of the inside (Sheet 2) is the inner face, also folded in
The content of those two panels is pulled 2mm outward, away from the fold edge:
.sheet:nth-of-type(1) > .panel.l { padding-left: 11mm; }   /* 9 + 2 */
.sheet:nth-of-type(2) > .panel.r { padding-right: 11mm; }  /* 9 + 2 */
Outlining the fonts
Chrome’s --print-to-pdf subsets and embeds fonts, but what the printer means by “create outlines” is
converting text into vector paths. Ghostscript does it without any Adobe tool:
& gswin64c.exe -o output.pdf -sDEVICE=pdfwrite `
    -dNoOutputFonts -dPDFSETTINGS=/prepress input.pdf
To verify, grep the PDF and check that the /FontName entries have dropped to zero:
grep -a "FontName\|BaseFont\|FontFile" output.pdf
# (empty)
Iteration 4 — the printer’s first feedback and the fold guide lines
The printer’s first review came back as a one-line question:
“Asking whether the dotted lines on page 1 are intentional.”
They were guide lines we had added to see the panel boundaries while working:
.fold {
  position: absolute; top: 3mm; bottom: 3mm;
  border-left: 0.25pt dashed rgba(255,255,255,0.1);
}
.fold.f1 { left: 99mm; }
.fold.f2 { left: 198mm; }
We had not noticed they would print along with everything else. Our answer to the printer:
“They are not intentional. A layout guide (dashed line) added during production to check the fold positions was left in place. We have uploaded a corrected version with the dotted lines removed; please work from the new file.”
The patch was one line:
.fold { display: none; }Running the Chrome and Ghostscript pipeline again and uploading the new PDF to the same slot took under five minutes.
The one-line Chrome and Ghostscript build pipeline
Building the print PDF came down to two commands that ever needed repeating:
# 1) HTML → PDF
chrome --headless --disable-gpu --no-margins \
       --print-to-pdf-no-header \
       --print-to-pdf=raw.pdf \
       file:///path/to/tone_c_print.html

# 2) PDF → outlined PDF
gswin64c -o final.pdf -sDEVICE=pdfwrite \
         -dNoOutputFonts -dPDFSETTINGS=/prepress raw.pdf
Fix one line of CSS, press Enter, and 30 seconds later the print PDF is up to date.
Retrospective — a print-ready PDF without a design tool
You can produce print-ready work without a design tool
Millimeter-precise placement, embedded fonts, vector graphics, bleed — nearly everything print work needs was handled with standard web technology and open source. No licenses, and an unexpected bonus: the entire design history is tracked in git.
The real value of working with AI is that retrying gets cheap
When the requirement is not yet clear, throwing it at the AI at least produces something. Even if it is wrong, “it is overlapping above” is enough to trigger the next attempt. That is why AI suits design, which is fundamentally iterative work — the cost of each attempt converges on zero.
The shortest instruction we gave during this job was “undo…”. It was a request to roll back after a wrong turn, and the next message found a better approach together. That “hmm… this isn’t quite it” moment from a design review works exactly the same way in code.
Next
- Extend the same pipeline to a series: business cards, leaflets, catalogs
- Attach a “build the print PDF automatically” action to the Astro static site (push and the PDF refreshes)
- Color profiles (CMYK conversion) — currently everything is RGB and left to the printer’s RIP
The PDF output and the HTML source are version-controlled in git. The final print file is a 1.37 MB A4 tri-fold PDF with the fonts fully outlined.
Standard web technology and open source alone produced a print-ready PDF that meets bleed, fold, and font-outlining requirements, with no design tool involved.
Contact
- Email: [email protected]
- Instagram: https://www.instagram.com/going.sen/
- Website: https://intosen.com/kr/consult/
Comments
Enter a nickname to leave a comment, or sign in with Google or GitHub.