
How it started - the Raspberry Pi Zero 2 W is sold out
ZPi Controller, the low-cost industrial controller we build, has a Raspberry Pi Zero 2 W at its heart. At 15 dollars list price, around 30,000 won in Korea, it gave us WiFi, Bluetooth, and a quad core in one board - exactly right for small-scale automation. Gave, past tense, for a simple reason.
It is sold out. Not at one or two shops but everywhere. Stock appears and vanishes quickly, and the price runs two to three times list. For someone building and selling a product, not being able to get the core part simply means not being able to sell.
So we started looking for a substitute. The requirements were clear.
- Similar size and price - do not stray far from the Zero 2 W form factor
- Built-in WiFi - wireless is a premise of ZPi, so this is mandatory
- Linux plus .NET - our software stack runs there
- Actually obtainable - which was in fact the most important one
That is how we came across the Luckfox Lyra Zero W.
The candidate - the RK3506B-based Luckfox Lyra Zero W
The RK3506B is the Rockchip SoC this small SBC is built on. The name says “Zero W” outright, so it is openly aimed at the Raspberry Pi Zero. Side by side, it looks like this.
| Raspberry Pi Zero 2 W | Luckfox Lyra Zero W | |
|---|---|---|
| SoC | BCM2710A1 (4×Cortex-A53) | RK3506B (3×Cortex-A7) |
| Bits | 64-bit capable | 32-bit only (ARMv7) |
| RAM | 512MB | 512MB |
| WiFi/BT | 2.4GHz + BT | 2.4GHz WiFi6 + BT5.2 |
| Display out | mini-HDMI + DSI | DSI only (no HDMI) |
| CAN | None | 2 channels built in (CAN-FD) |
| Wired LAN | None | None (expandable over SPI) |
| Boot | SD card | SD card / on-board NAND |
RAM is the same, and the wireless is actually newer (WiFi6). What really caught our eye were the last two rows. CAN is built into the SoC. For someone building an industrial controller that is a bigger difference than it looks. On the Pi, using CAN meant hanging an external chip off SPI; here it is simply there.
There is no free lunch, though. It is 32-bit only and there is no HDMI. Whether those two trip us up later is half of this post.
Move 1 - flashing the image with SDDiskTool works differently
Flashing the image is the first place anyone coming from the Pi gets caught out. Raspberry Pi Imager does not work. Neither does balenaEtcher.
The Raspberry Pi writes a whole raw image to the SD card, so any tool will do. Rockchip parts
use a dedicated image (update.img) that bundles the bootloader, the partition table, and
the root filesystem into a single lump. Write that as raw and the boot ROM does not recognise
it.
The answer is Rockchip’s own tools: SDDiskTool for writing a microSD, RKDevTool for putting it into the on-board NAND. There are also separate “SD” and “Flash” images, and they must not be swapped. Working this out alone cost us half a day. If you are coming from the Pi, remember this part - the flashing tools are completely different.
Move 2 - because it is 32-bit, because it is DSI and not HDMI
Booting Linux went fine once the image was in. Getting our software onto it ran into two things.
First, 32-bit. .NET runs without trouble, but the build target has to be linux-arm
rather than linux-arm64. The build we used on the Pi (64-bit) does not go straight across.
Fortunately it was only a target change, so it was minor. It ran well - about one second to
start, around 25MB of memory.
Second, no HDMI. Attaching a screen means using a DSI panel, and this is where we got badly stuck once. The default configuration was set for a particular panel resolution, so nothing at all appeared on the 800×480 panel we attached. When the signal does not match, the backlight comes on and the screen stays black. Only after switching to a panel profile that Linux supports did the display come up. If you are used to the Pi, where plugging in an HDMI monitor just works, this is another spot where you stop and think.
Once the screen was up it was actually fun. We put a status dashboard (network, CPU, logs) on it by drawing straight into the framebuffer with no GPU, and for an industrial status screen refreshing every two seconds that is plenty.
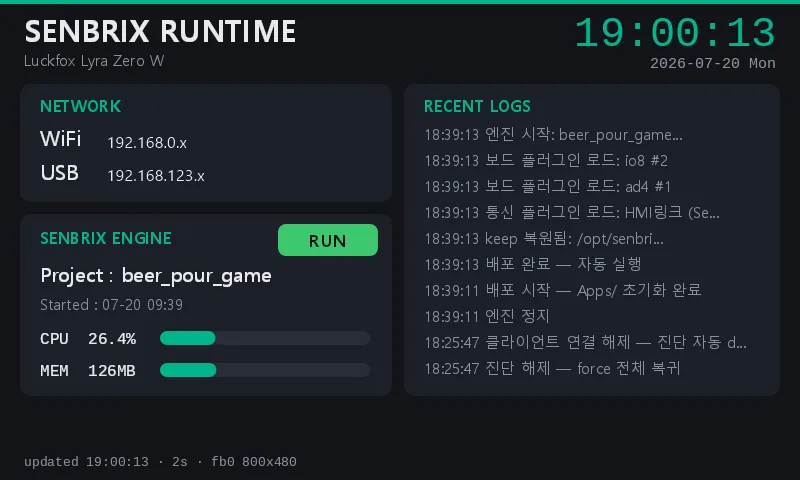
The screen above is the dashboard actually running on this board’s DSI panel. With no separate monitor and no desktop environment, drawn directly into the framebuffer, it comes up the moment the board boots.
Move 3 - WiFi power saving and the antenna
Wireless connectivity was a hard requirement, and it gave us a surprising amount of grief. It would connect, and then after a few minutes communication would die. The cause was the WiFi chip’s power-saving mode, and the option to disable power saving settled it.
One more thing - the default was the external antenna, and the external antenna was faulty, so the signal was weak. Switching to the on-board chip antenna improved it dramatically (−58dBm → −32dBm). On a small board, the antenna choice decides more of the performance than you would expect.
A lesson from here. On Linux, ping failing does not mean communication is failing. Our
router blocks ICMP (ping) replies, so ping failed while actual TCP traffic was perfectly
healthy. We mistook that for a network fault for a while and dug in the wrong place.
Check with a real port, not with ping.
We built what was missing - rebuilding the kernel
Rebuilding the kernel is the highlight of the project. To use the board at ZPi level we wanted
wired Ethernet and extra CAN attached as standard Linux interfaces (eth0, SocketCAN). The
carrier board has an Ethernet chip (W5500) and a CAN controller (MCP2515) on SPI, but the stock
kernel was missing those drivers.
Two options: insert a device tree overlay at runtime, or rebuild the kernel outright. We tried the former first, and the driver kept failing to take its interrupt. Digging into it, the runtime overlay was renumbering references and breaking the interrupt link. The direct route was to put it into the kernel source and rebuild.
We pulled the SDK, enabled the Ethernet and CAN drivers in the kernel configuration, described the two chips in the device tree with the correct pins, and rebuilt. The result was clean.
eth0- wired Ethernet comes up as a standard Linux interfacecan0- the extra CAN works over SocketCAN- add the SoC’s built-in CAN on top of that and CAN channels are plentiful
On the Pi, attaching even one CAN interface was a chore; here we ended up with CAN to spare. In the field that is a clear advantage.
Wrapping up - Senbrix driving the CAN expansion boards
A real control test was the point; setting it up and stopping there would be half a job. We put our industrial PLC software (Senbrix) on it and attached real CAN expansion boards. Two boards, an analog input board and a digital IO board, went onto the CAN bus, and we followed it all the way to the relay clicking at the end.
There was a small stumble here too. One expansion board would not join, and looking at the traffic we found we had flashed the wrong type of firmware onto it. With the right firmware it joined immediately. Not a hardware problem but human error - the usual kind of story.
Either way, the result is this. The control chain HMI screen → PLC logic → CAN expansion board → relay ran end to end on a Luckfox Lyra Zero W instead of a Raspberry Pi.
Recap: is it a viable Raspberry Pi substitute?
As a headless industrial controller - comfortably, and arguably better.
- CAN is built in, which helps for industrial communication
- The kernel is ours to modify, so wired LAN and CAN attach as standard interfaces
- WiFi6 with an on-board antenna; the wireless side is solid
- It is obtainable (this is the big one)
Be careful in these cases, though:
- If you were plugging in an HDMI monitor, you now move to a DSI panel. The plug-it-in-and-it-works convenience is gone.
- If your project used 64-bit software, it has to be rebuilt for 32-bit.
- Flashing and setup work differently from the Pi. If the Rockchip ecosystem is new to you, there is a learning curve.
To sum up: for anyone who plugged in a Raspberry Pi and used it as it came, plenty here feels unfamiliar. But for anyone who wants to attach CAN and wired LAN and build a proper industrial controller, this can be a better choice than waiting for a Pi to come back in stock. We have decided to prepare the next generation of ZPi on top of it.
With CAN built in and a kernel you can modify, a headless industrial controller is better served here than waiting for a Pi to come back in stock.
Contact
- Email: [email protected]
- Instagram: https://www.instagram.com/going.sen/
- Website: https://intosen.com/kr/consult/
Comments
Enter a nickname to leave a comment, or sign in with Google or GitHub.