
A school stage carries a lot of equipment: curtains, light bars, a screen, a flagpole. We built a stage control HMI where you press that equipment on a 3D stage to select it and move it.
This post records which outside programs we connected to build and run that touch panel HMI, and how they fit together.
You can operate the demo below. It is not connected to any equipment; it talks to a virtual board inside your browser. Until you touch it, it demonstrates the steps by itself. Press the screen and the demonstration stops so you can take over.
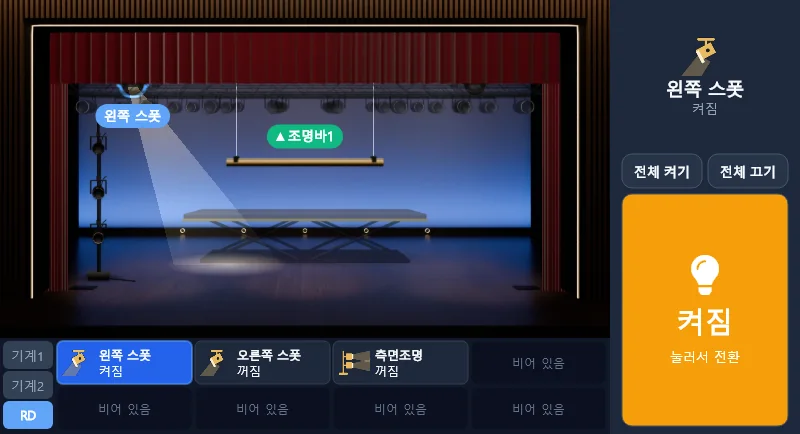
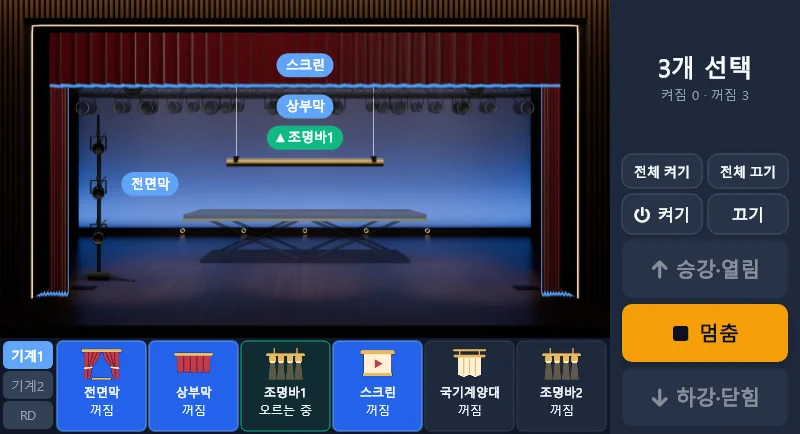
- Press equipment on the stage or a slot below to select it, then use the buttons on the right to move it
- Hold a slot for 0.7 seconds to start selecting several; the slots you press next join the selection
- Turn on a light in the RD (lighting control) tab at the lower left and it lights the stage
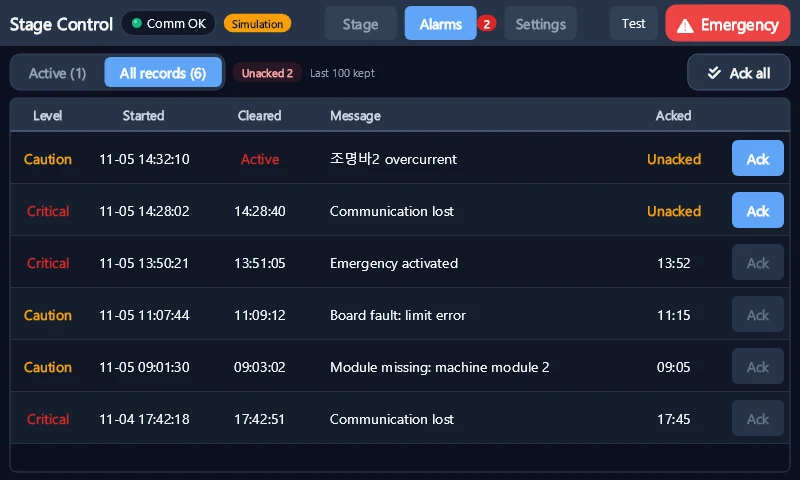
- Use the Test button at the top to cause a communication loss, an emergency, or an overcurrent, and watch the controls lock
- On the Settings screen, an icon sets an item’s shape, and a word like Front or Rear in its name sets its place
- On the placement board in Settings, drag equipment to move it, and switch boards with the Overhead and Floor buttons
The overall flow
Pictures made in Blender are processed with Python and loaded into a C# program. The program layers those pictures and moves them according to the board status it reads over Modbus TCP. We ran the whole process with Claude Code and DV-HMI. The program is built to run on the SENVAS Touch panel, a Raspberry Pi HMI. See the SENVAS Touch introduction for details on the panel.
| Program | Version | Role |
|---|---|---|
| Blender | 5.1 | Renders the stage and equipment as separate layers |
| Python, Pillow | Crops the pictures into webp files and a position table | |
| .NET, C# | 9 | The touch program itself |
| Devinno.UI | 0.4.11 | Screens, buttons, tables, dialogs, on-screen keyboard |
| Devinno.UI.OpenTK | 0.4.11 | The window on the panel |
| SkiaSharp | 3.119.4 | Draws the stage |
| Devinno.Communication | 0.1.1 | Modbus TCP with the board |
| xUnit | 2.9.3 | Automated tests against a fake board |
| Claude Code, DV-HMI | 0.1.29 | Runs requirements through verification, screen renders, dashboard |
| Drive control board | The board that actually moves the equipment | |
| SENVAS Touch panel | The Raspberry Pi panel running the program, 800×480 |
Blender rendering: a 3D stage as separate layers
The stage frame, velvet curtains, wooden floor, and equipment are all modeled by one Blender Python script. Blender runs without a window using blender --background --factory-startup --python, and renders with the Cycles engine. To change a picture, we edit the script and run it again.
Equipment rises and curtains open, so the stage cannot be a single render. The background, the front frame, and each equipment type are rendered as separate PNGs with transparent backgrounds. All equipment is rendered at the same depth, and the program scales it around the vanishing point to place it front or back. Moving an item forward or back therefore needs no new render.
Python and Pillow: a size that suits the panel
The rendered PNGs are too large to use directly. A Pillow script crops the transparent margins, saves webp files, and writes each layer’s position and size relative to the vanishing point into layers.json. To show a selected item with a glowing outline, it also makes a separate layer holding only the outline of each shape. The whole set of stage pictures comes to about 200 KB.
SkiaSharp: layering the stage
The C# program reads layers.json and the webp files, works out each item’s position from its height, and draws from back to front with SkiaSharp. The front frame goes on top, and the result reads as a 3D stage. Lights that are on add a beam and a soft pool on the floor.
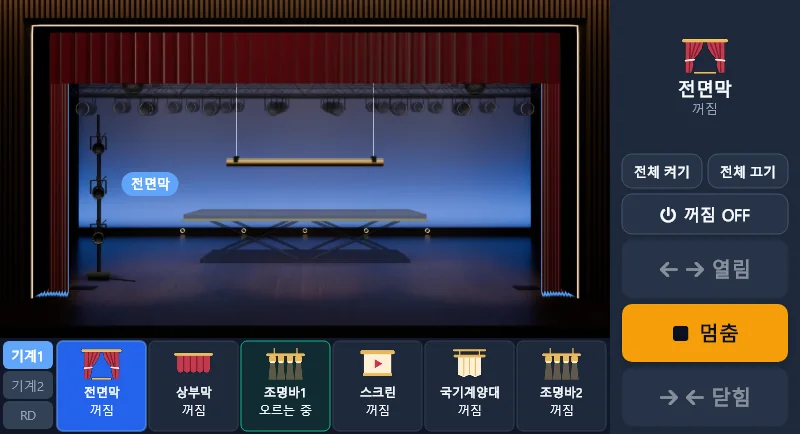
Height took the most thought. The equipment has no encoders, so the board only reports whether an end has been reached. The program therefore estimates height from each item’s travel time and corrects it when the end signal arrives. Items whose height is unknown, right after power-up or after communication comes back, are drawn faded.
The stage placement board: where equipment goes
Settings decide shape and place: the icon sets the shape, and the name sets the place. A name containing a word like front, rear, or left sends the item there.
Without such a word, an item takes a default position based on how real stages are rigged. The equipment order and distances draw on the published line set schedules of a school stage and a theater.
| Equipment | Distance from the stage opening |
|---|---|
| Top curtain | 0.4 m |
| Front curtain | 0.6 m |
| Light bars | 1.2 m, 3.8 m, 6.4 m |
| Screen | 2.0 m |
| Middle curtain | 5.0 m |
| Rear curtain | 8.6 m |
| Back wall | 9.2 m |
These values come from stages abroad, so a real installation has to check them against that stage’s own drawings. We found no matching source for the flagpole, banner, lift, or light slots, so we set those default positions ourselves.
You move items by hand on the stage placement board. It splits into two boards according to where the equipment sits, and the buttons at the top of the board switch between them.
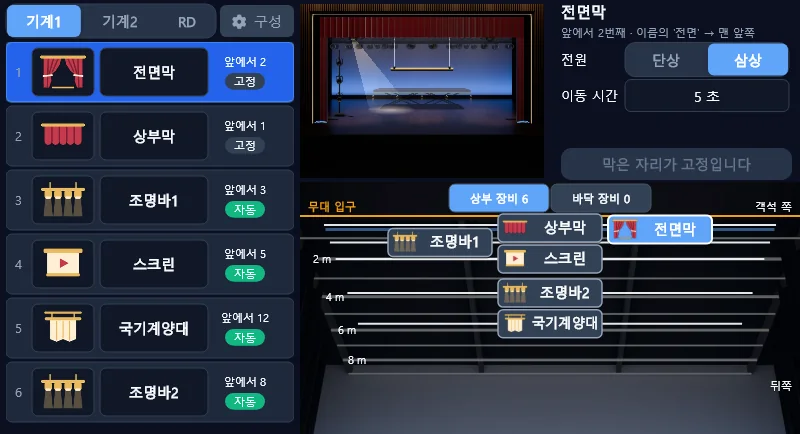
- Overhead board: for equipment that hangs, such as curtains, light bars, and the screen. It looks up at the rigging at 35 degrees, so the stage opening is at the top of the board
- Floor board: for the stage lift, pillar lights, and side lights. It looks down at the floor at 35 degrees, so the stage opening is at the bottom of the board
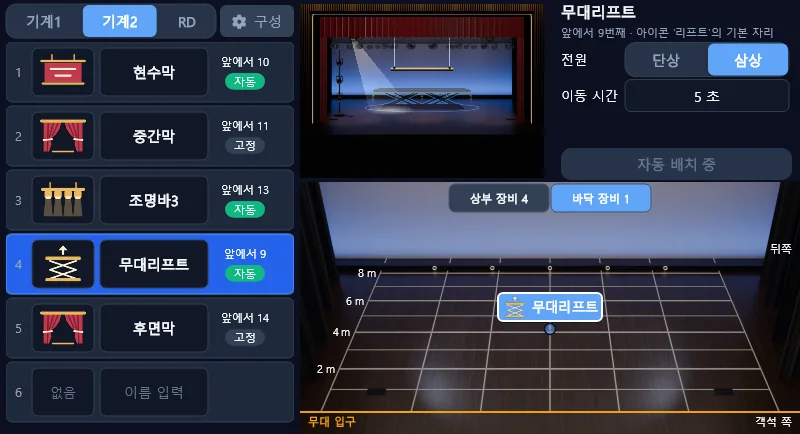
How an item moves depends on its type. Items that span the stage move only forward and back, items at a single point also move left and right, and the forward and back position snaps to rows 0.4 m apart. The top curtain and curtains are fixed in place and cannot be dragged.
Labels never overlap one another. A dot or a row shows an item’s true position, and a line connects the label when it sits away from that position. The board picture and the program’s coordinate math use the same camera values from the Blender render, so a dropped item lines up with the rows in the picture.
Devinno.UI: screens and touch
In Devinno.UI, each screen is a pair of DVML markup and a C# class. Values connect through bindings, and the buttons, tables, dialogs, and Korean on-screen keyboard come from the library. Devinno.UI.OpenTK provides the window on the panel.
What the library does not have, we built by inheriting DvWidget: the 3D stage and the placement board. We also made one touch part, because a standard button acts when the finger lifts, while raise and stop have to go out the moment the finger lands.
Devinno.Communication: Modbus TCP with the board
In Devinno.Communication, you list the read ranges and named writes in XML. The library then reads them periodically over Modbus TCP and reports them as events. The program replaces the received values as one bundle, so a screen never sees half-updated values.
To move several slots together, the commands go out in one frame so they start at the same moment. If the board does not answer for 2 seconds, the program treats communication as lost, darkens the stage, and locks every control except stop. Commands pressed after the loss is detected are discarded.
A fake board and xUnit: testing without equipment
Using the Modbus TCP slave from the same library, a fake board that follows the real board’s behavior runs on the PC. The program connects to it over the same communication path as the real thing. The xUnit tests check which values commands send and whether locks engage, and they assemble the program without a window and press the screens with touch events. There are more than 280 tests.
Claude Code and DV-HMI: the whole process
The code was written with Claude Code and the DV-HMI plugin. Requirements come from an interview, then the work moves through plan, build, and verify, and a person reads and approves each stage before the next one starts. What DV-HMI is, is covered in the water pump sample post.
- It renders screens to pictures without starting the app, and reports clipped text and parts that go outside their area
- The dashboard shows the stage of the work, the requirements, and test results, and has buttons for build, run, and deploying to the panel
- Features that move equipment are proposed first and built after an answer
- At the end, a subagent that did not write the code reviews it, and limits the screen program cannot prevent go into the requirements
How it operates
- Smooth motion: the picture redraws 25 times a second while moving, and when an end signal arrives early, it glides to the end within 0.5 seconds without jumping
- Automatic stop at the ends: an item stops at its end and the raise button turns off. For a slot with no end signal, the touch panel sends stop once the time to reach the end has passed
- All on and all off per tab: machines and lights (RD) are entirely different controls, so these buttons act only on the current tab’s side
- Selecting several: holding a slot starts the selection, which adds no button to the panel
- Respecting the switch board’s stop: while someone holds stop on the switch board, raise and lower from the touch panel are locked for that slot
The demo in this post
The C# program does not run in a browser as is. The demo uses the same webp files and layers.json, ports the position, height, and lock rules to JavaScript, and draws on a canvas. The board is also virtual, inside your browser. The password screen, configuration dialog, and single-phase and three-phase settings are left out of the demo. Press an item in the Try these list under the panel, and the demo moves to the right screen and marks where to press.
Where it stands
This is a test project and is not being installed on site. The behavior described here was tested against the fake board. The program is not a safety device; stopping when a person is in danger is the job of the physical emergency switch.
Summary
- Rendering in separate layers with Blender lets the program draw a 3D stage without a new render when an item’s height or place changes
- Default positions draw on published line set schedules, and the stage placement board separates overhead and floor equipment for dragging
- Screens use Devinno.UI and SkiaSharp, communication uses Modbus TCP through Devinno.Communication, and testing uses a fake board and xUnit
- Equipment without encoders has its height estimated from travel time and corrected by the end signal
We built a touch panel HMI with DV-HMI that you control by pressing a picture of the stage. Real equipment has to be tested by a person, so everything here was confirmed against the fake board.
Contact
- Email: [email protected]
- Instagram: https://www.instagram.com/going.sen/
- Website: https://intosen.com/kr/consult/
Comments
Enter a nickname to leave a comment, or sign in with Google or GitHub.