

Part 3 is the program. Ask the AI for a ladder in one line, deploy it to the board, and move a relay.
What you need
| Item | Detail |
|---|---|
| Project | Test from Part 2, with main board GO-RP2040-CB08 and the port already set |
| Board | USB and DC 24 V connected, buttons on IN01 and IN02 |
| Claude Code | Installed and logged in as in Part 1 |
1. Open the Claude console
| Mode | When |
|---|---|
| 1. AI mode | The AI runs everything from interview to verification step by step and asks for approval at each step |
| 2. Assistant mode | Ask and it edits right away. This is the one used here |
When the Mode field at the top of the AI page reads Assistant Mode, you are ready.
2. Ask for the ladder in one line
On main board GO-RP2040-CB08, make a latching circuit: pressing IN01 turns OUT1 on, pressing IN02 turns it off.
Three seconds after OUT1 comes on, turn OUT2 on as well. Use the I/O mapping for addresses (inputs P0-P3, outputs P4-P7).
When it finishes, open Symbols and Ladder in the left menu and check that the result matches what is below.
Symbols
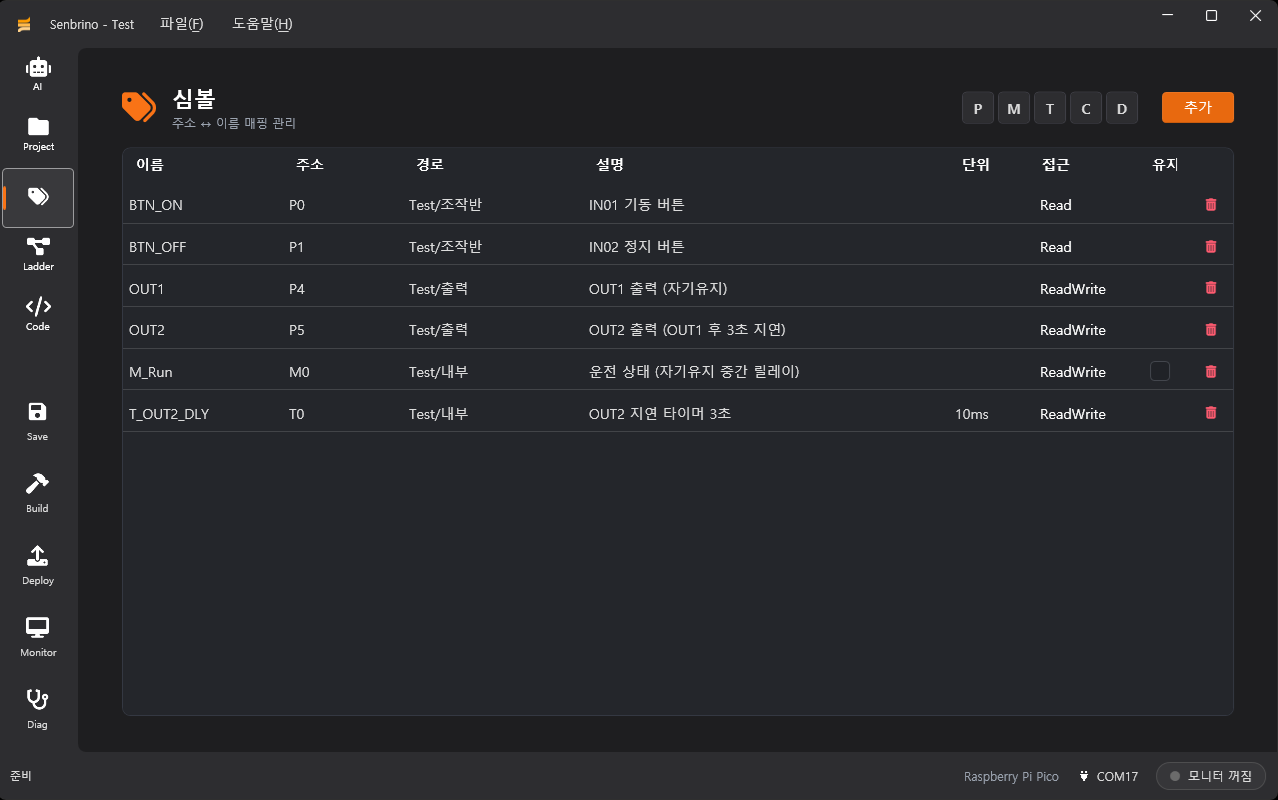
| Name | Address | Role |
|---|---|---|
BTN_ON | P0 | IN01 start button |
BTN_OFF | P1 | IN02 stop button |
OUT1 | P4 | OUT1 relay |
OUT2 | P5 | OUT2 relay |
M_Run | M0 | Run state |
T_OUT2_DLY | T0 | 3-second timer |
Ladder
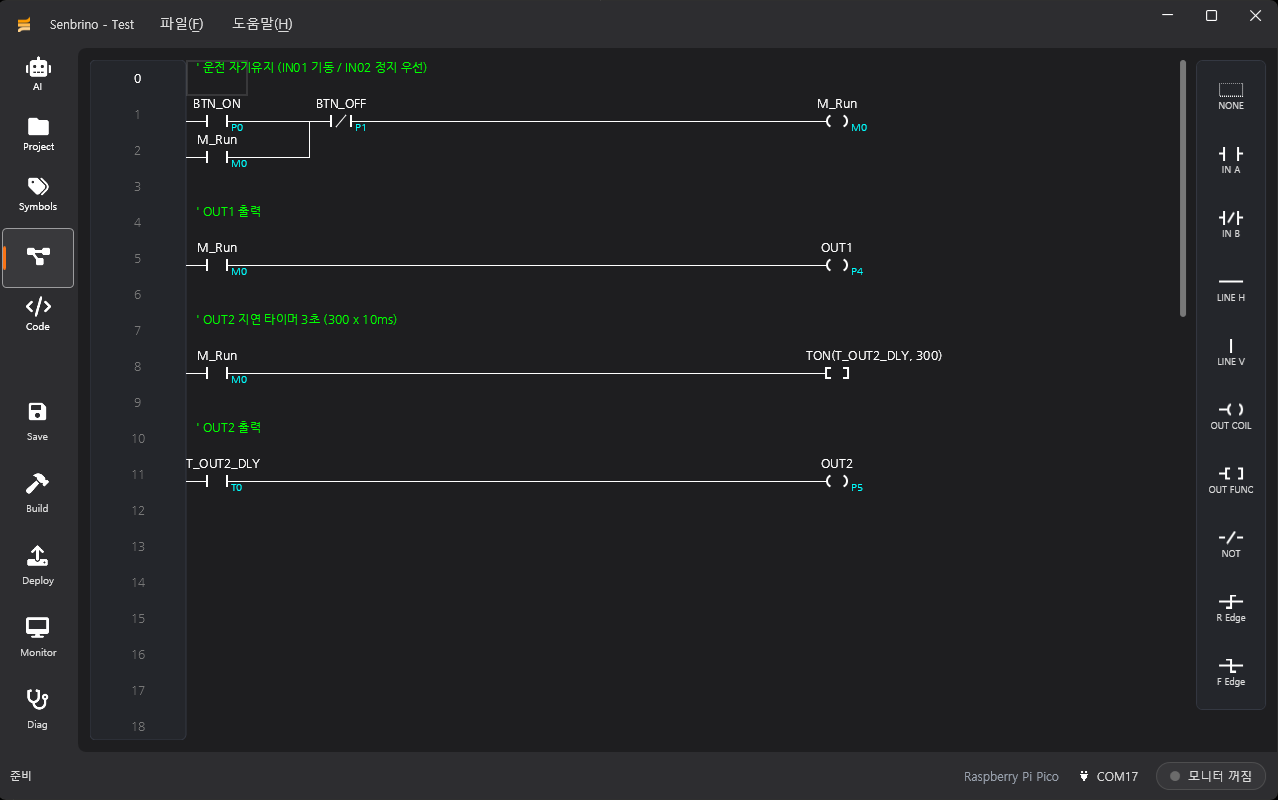
| Rung | Content |
|---|---|
| 1 | BTN_ON or M_Run → BTN_OFF NC contact → M_Run. Stop-priority latch |
| 2 | M_Run → OUT1 |
| 3 | M_Run → TON(T_OUT2_DLY, 300). 10 ms × 300 = 3 s |
| 4 | T_OUT2_DLY → OUT2 |
3. Deploy
| Status bar | Meaning |
|---|---|
| Building… | Converts the ladder to Arduino code and compiles it |
| Uploading… (COM17) | Uploads over the port picked in Part 2. The port number differs from PC to PC |
| Upload succeeded. The board is booting the new firmware. | The board runs the program |
The first deploy
The first time you click Deploy, two windows come up one after the other before the build. They do not appear again.
| Window | Button | What it installs |
|---|---|---|
| Install arduino-cli | Install | arduino-cli, the compile and upload tool |
| Install Core | OK | The rp2040:rp2040 board core. Takes from tens of seconds to a few minutes |
4. Check it in the monitor

| Action | Result |
|---|---|
Press IN01 | M_Run and OUT1 ON. The OUT1 relay closes |
| 3 seconds pass | The timer value reaches 300 and OUT2 goes ON. The OUT2 relay closes |
Press IN02 | Everything OFF |
Recap
| Part | What you did |
|---|---|
| Part 1 | Installed the editor and Claude Code |
| Part 2 | Wired the buttons, set the main board and port |
| Part 3 | Ladder from AI, deploy, monitor |
Comments
Enter a nickname to leave a comment, or sign in with Google or GitHub.